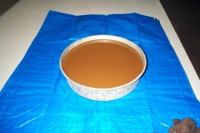
Coolant FlushDraining the old fluid: First off, drain out as much old coolant as you can. Jack up the back of the car higher than the front, remove the front-most underbody cover (seven 10mm bolts), and remove either the drain bolts shown here, or use the draincock on the bottom of the radiator. I chose to use these 2 drain bolts, because my radiator draincock was plugged. Make sure to remove the radiator cap and also loosen the drain cock on the top of the radiator. This will allow air to vent into the pipes, allowing the coolant to drain out easier. Here's what came out. Nice and brown huh? They say this is from mixing the Toyota red coolant with the typical Prestone green stuff. Make sure to dispose of this stuff properly. Ya wouldn't want to kill any of your neighbors pets now would ya???
Flushing the coolant system Here's what I found to be the simplest for me. There are a few other ways to do this, e.g. using the radiator drain cock. But the drain cock on mine is plugged, so that didn't work. 1) Remove the drain bolt on the coolant pipe going from the radiator cap to the radiator, the red circled one below (leave the other bolt on, unlike the below pic). Then without the car running, the rear of the car higher than the front, place a garden hose at the radiator cap, and begin running water through. Run the water through, until it becomes clear. Of course this may take a few pan-fulls. So watch the level of the pan closely. A second person to run the hose while you monitor the pan during this entire process helps tremendously. Be prepared to get your hands dirty when placing the bolt back on as it is still draining out and your pan is full. Replace the bolt when done.
2) Next up is flushing out the radiator. (This can get messy, and it is possible to skip this step if you don't want to clean up after yourself) Remove both upper and lower hoses on the radiator, by moving the spring clips. Then place the garden hose into the upper hole in the radiator, draining the water out of the lower one. Flush it until clear water comes through, and then replace the hoses.
3) Now, use the drain bolt on the coolant pipe, that leads to the thermostat (red circle, leave the other bolt on, unlike shown in the below pic). Run the garden hose from the radiator cap flushing out the system from the radiator cap, up through the radiator and back halfway under the car. Again, once it turns clear you're done with this step. Replace bolt.
4) Now for the engine block and the rest of the way up this pipe. Make sure all coolant bolts and hoses you removed before are securely fastened. Fill up the system with water from the garden hose, until it's full in the radiator cap. Start up the car, with the heater control set to hot (no need to turn the fan on). Monitor the level in the radiator cap to keep it topped off. Once you see the water start to bubble over, place the radiator cap on halfway (to the first click). When the car approaches normal operating temperature, it is time to remove one of the coolant pipe drain bolts. (mine was about 2/3 the way up to normal operating temp when I undid the bolt) Have the person that is running the hose, be ready for when you remove the bolt, you would like to keep the coolant level topped off. Be very, very careful when undoing the bolt. The coolant will be hot and it will come out of the hole fairly quickly. I'd suggest wearing a good set of gloves when doing this. Just make sure not to drop the bolt in the pan. When the pan is almost full, replace the bolt. Again this will be messy, and the coolant coming out of the hole will be hot. Empty the pan and keep the garden hose running to top off the level. Once the pan is empty, position it again and undo the bolt, repeating this entire process till the water is clear. After a few times, the coolant cools down from the constant running of the garden hose water running through. So it becomes less painful... Now repeat this process again, but with the other bolt on the coolant pipe. It won't take near as long doing this one. Keep the car running during this entire process, making sure to keep the coolant level topped off.
Here's a pic of the first night of flushing the system, over 8.5 gallons. About 2.5gallons came from draining the car initially (I ran out of containers). This was the morning after, before taking the containers to empty at the local recycling center. Once you notice that the coolant is starting to thin out it is probably safe to dump in your yard. Don't quote me on that, save the environment...
5) When you are satisfied with the color of the water coming out of the coolant pipe, turn the car & garden hose off, and drain as much of the water out as you can. Then start filling the system with the Toyota coolant. Follow the repair manual for the filling procedure. Below is just a pic of the Toyota coolant mixed with water, 50/50. |
Home • Links •
Email
(remove NOSPAM from resulting email address)
Thanks for Visiting! - Eric Southers
Disclaimer: This web page in no way replaces
the MR2 repair manual. Follow what it says before me. The purpose of
this page is to give you a better pictorial description of what to do.
I cannot be held responsible for any mishaps caused by this web page.


